
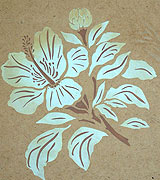
What is Stencilling?
Stencilling is a fantastic decorating medium for creating up to the minute style and your own interior design statement. It is great for beginners and professionals alike, allowing you to print/transfer an already designed pattern onto a surface using paint, as many times as you like and in as many different arrangements, finishes and colours as you like. So there is plenty of room for creativity.
Getting Started
Henny has put together this easy to follow, illustrated step by step guide on how to stencil, to help get you started – so you can see at a glance what a practical and simple decorating medium stencilling really is. This guide should give every beginner the confidence to get started and a refresher course for those who have not done it for awhile! See more tips and helpful hints below and details of the paints and useful equipment to use – all available through this website. For best results with your stencil projects we strongly recommend only using specific stencil paints or water based or acrylic paints for stencilling and never oil paints or decorator’s oil paints (different to the old fashioned stencil sticks). Oil paints are very difficult to use, damage the stencil very quickly and generally create a lot of mess, bleeding and poor results. Use suggested paints and varnish with acrylic varnish where a tougher finish is required.
How to Stencil - Step by Step Guide
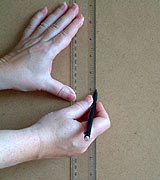
Step 1 – Marking up for Stencilling
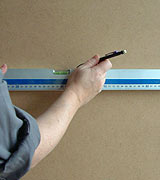
A few registration marks can be useful for positioning your stencil – use a pencil and spirit level or ruler to make a few horizontal and/or vertical registration marks in which to position the stencil.
Step 2 – Apply Repositionable Adhesive

Hold the can about 12 inches from the stencil and apply a fine film of repositionable spray adhesive to the reverse side of the stencil sheet/s (adhesive from stationers and craft shops).
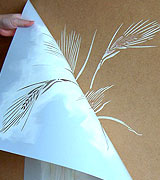
Step 3 – Position the Stencil
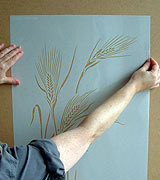
To position the stencil line up the top and sides of the stencil sheet with the registration pencil guides you have made – this will ensure the stencil is straight within the stencilling area.
Step 4 – Stick the stencil securely down
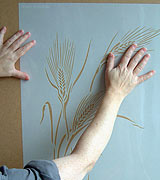
Carefully stick the stencil down to the surface being stencilled ensuring all cut out shapes and bridges and delicate areas are stuck down – this will prevent paint bleeding under the stencil.
Step 5 – Pour out Stencil Paint
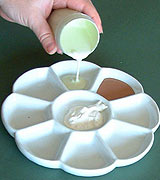
Tip a small amount of the stencil paint colour/s to be used onto a paper or ceramic plate or into a divided flower palette. Only pour out a small amount and add more as you use it.
Step 6 – Load up Stencil Sponge or Brush
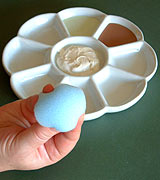
Dip the stencil sponge or brush into the stencil paint. Only take up a little paint – too much paint will be prone to bleeding. See notes below on stencilling with rollers.
Step 7 – Dab of excess paint on kitchen towel
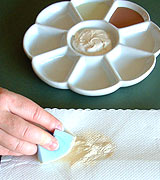
Dab the stencil sponge or brush onto some kitchen towel to remove the excess paint. Working with a nearly dry applicator will prevent any possible bleeding. Protect the surface underneath the kitchen towel with some plastic or other waterproof material to prevent paint damaging surface below.
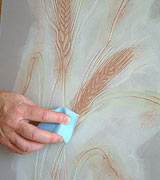
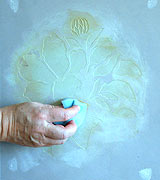
Step 8 – Stencilling with Stencil Sponge
Gently work the stencil sponge over the stencil, wiping it over each cut out shape in smooth movements, gently pushing paint into al the detailed cut out shapes. Sponges are good for delicate stencils and for achieving crisp edges. Sponges can be washed whilst wet or desposed of after use.
Step 9 – Stencilling with Stencil Brush
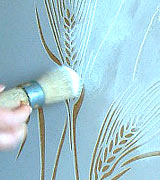
Work the stencil brush over the stencil in circular movements building up colour. Our specially domed brushes are best for this, as the rounded tops create a smooth professional finish. Brushes can also be used for creating more textured stippled effects, or spattering colour through the stencil.
Step 10 – Load up Stencil Roller with paint
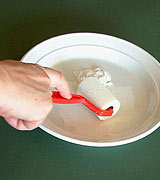
Stencil Rollers are very good for stencilling larger areas in single colours as they speed up the stencilling process. They are also excellent for intricate, delicate stencils as they do not pull up delicate sections of the stencil, eliminating possible snagging. To load the paint onto the roller dip into the paint and work over the plate or tile until the whole roller is covered.
Step 11 – Removing excess paint from roller
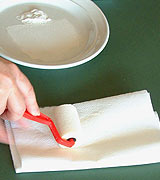
Once the whole of the stencil roller has been covered in paint, work the excess paint off by the stencil roller by rolling it over some kitchen towel. It is better to start stencilling with a nearly dry stencil roller as this will prevent paint seeping under the cut out areas of the stencil shapes. Protect the surface underneath the kitchen towel with some plastic or other waterproof material.
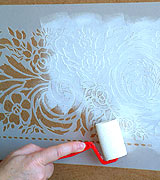
Step 12 – Stencilling with Stencil Roller

Gently roll the stencil roller over the secured stencil covering all cut out shapes with paint. Re-load the stencil roller as necessary until the whole of the design is covered. Then go back over the stencil again to build up opacity and eliminate any roller lines. As you build up successive coats you can work with a little more paint as the stencil edges will be sealed and less likely to bleed.
Step 13 – Applying other
colours
If you are using several colours for your stencil repeat steps 6 – 8 for each colour. Allow each colour to dry before applying the next, unless you wish to ‘mix’ colours as they are applied. There will be a natural, attractive overlap of different colours on multi-coloured schemes. If you wish to prevent this overlapping use small cut down sections of stencil sponge or small stencil brushes for more detailed areas.
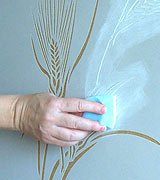
Step 14 – Applying Metallic
Stencil paint
To add metallic or glitter highlights leave the stencil in place and over-stencil with Metallic, Glitter or Interference Paint. Use the same technique as before working with only a little paint as metallic colours tend to be more fluid. Build up layers to intensify the effect. Metallic or glitter finishes are stronger and more lustrous when applied over a base stencil paint of a similar colour, or very subtle if simply used on their own.
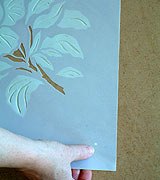
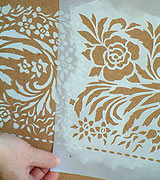
Step 15 – Removing the
stencil
Once you have completed the stencilling and applied all of the chosen colours and finishes, carefully peel the stencil away from the surface and allow the paint to dry. To store your stencil lay it flat on a large sheet of paper and smooth it down to stick to the paper – the original repositionable spray adhesive on the reverse side of the stencil sheet will keep
it in place. Store flat.
Two-Layer and Repeat Stencilling
Two Layer Stencils – Step 1
Stencilling Layer One
To stencil the first layer of the design follow steps 1 to 14 of How to Stencil above, adding metallic highlights or ‘blushed’ areas as required. Then use a stencil sponge or pencil to mark through the registration dots in the corner of the stencil sheet. Remove the stencil sheet and allow the paint to dry or use a hairdryer to speed things up.
Two Layer Stencils – Step 2
Aligning Layer 2
Line up the registration dots on the 2nd layer of the stencil with the marks that you have made from the first layer, whilst checking that the layer two details (usually leaf veins and flower stamens and other smaller details) lie within the layer one stencilled shapes. Stick down carefully ensuring all detailed areas are stuck down fully.
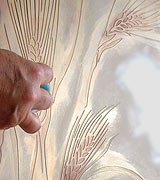
Two Layer Stencils – Step 3
Stencilling Layer 2
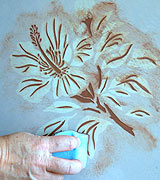
Then stencil the second layer with your chosen colour/s. Layer two details are often quite fine so make sure the stencils paint is gently pushed into all lines and shapes. Over-stencil with metallic paint if desired. Peel off the stencil and remove registration marks with the original wall paint or by with a pencil eraser or some cream household cleaner
Two Layer Stencils – Step 4
Finishing
Tips for finishing your stencil decoration. If you have applied your stencil to a wall in a room that is subject to moisture such as a bathroom or kitchen wall or an area subject to heavy traffic such as a hallway or child’s room, or on a piece of furniture use our Acrylic Matt or Eggshell Varnish to seal the area and protect the decorative effect and prolong its good looks.
Repeat and Border Stencils
Step 1 – Marking up
Use a pencil and ruler or spirit level to make some light horizontal and/or vertical registration marks to line up the edge of the stencil sheet to. Along with the registration dots on the stencil this will ensure that each successive repeat of your border/repeat stencil will
remain ‘square’ and that the design doesn’t veer off at an angle. Use a plastic eraser or household cream cleaner to remove the marks after stencilling.
Repeat and Border Stencils
Step 2 – Stencil First Repeat
Apply repositionable spray adhesive to the reverse side of the stencil. Stick the stencil down lining up the edge of the stencil sheet with the horizontal and/or vertical pencil registration guides you have made to ensure the stencil sits squarely within the area. Use
a stencil roller if you are only using one colour to stencil as this will assist in speedy and even coverage.
Repeat and Border Stencils
Step 3 – Registration Dots

Use a pencil or stencil paint on a stencil sponge to mark through the registration dots in the corners of the stencil.
This will enable you to line up the next repeat of the border or repeat stencil – to create a continuous pattern repeat. Remove the stencil and allow to dry before continuing.
Repeat and Border Stencils
Step 4 – Aligning repeats
For the second repeat line up the registration dots in the corners of the stencil with the marks made through the
registration dots from the first repeat. Also make sure the stencil sheet lines up with your horizontal or vertical registration pencil marks to ensure the design is ‘square’.
Repeat and Border Stencils
Step 5 – Second Repeat
Stencil the second repeat with the same colours as before. Multiple colour schemes should be stencilled in the same
colour order to ensure colour continuity. Repeat Steps 2 – 5 until complete. For two layer stencils finish stencilling the whole of the first layer, then apply the second layer.
Paints for Stencilling
All of the paints on the Motif website have been made with stencilling in mind.
Our Stencil Paints in Henny’s own choice of colours come in 75 great matt shades and are the ideal paint for achieving really good quality stencilling results. Use on their own for a matt finish or add lustrous highlights with our metallic paint options (see below). Each stencil page on this website offers a range of Stencil Paint colour options with links to the relevant paint colour pages so you can purchase these easily.
Our Metallic Stencil Paints and Metallic Interference Paints (two-tone metallic colours) can be stencilled over the Stencil Paint colours for really lustrous effects. Use darker and bright Stencil Paint base colours to achieve full on, richer effects and lighter pastel Stencil Paint base colours for lighter, truely reflective results. For more subtle and translucent effects and a more tone-on-tone effect use the metallics on their own. You will only need a little metallic or interference colour on your sponge to achieve a great effect, over-stencilling to increase drama – so a little paint goes quite a long way. Apply with stencil sponge. These paints are not suitable for fabric that requires washing.
Use Glitter Paints to add sparkle and glistening metallic shine. Glitter Paint is made of fine glitter particles in a binder that dries to a clear finish so they are best applied over our Stencil Paints to achieve best results. Use a Stencil Paint base colour that is close to the Glitter Paint shade that you are planning to use. Apply with a stencil sponge and dab on lightly to create a sparse glittery effect, or apply repeatedly to build up to a full metal effect. These paints are not suitable for fabric that requires washing.
Our high quality Fabric Paints have been specially chosen for their luminosity of colour and quality colour fastness and we feel these are the best Fabric Paints on the market. Available in 24 beautiful shades including 3 metallic colours. Suitable for natural fabrics such as linen, cotton, voile, silk and viscose. Can be machine washed after ironing reverse side of fabric with hot iron.
Go to: Stencil Paints, Metallic Stencil Paints, Glitter Paints, Interference Paints and Fabric Paints.
Equipment for Stencilling
Henny has devised a range of stencilling equipment that really works and is easy to use.
Use Stencil Sponges for most stencilling jobs – sponges are great for creating a smooth finish and for blending and adding ‘blushed’ effects. Sponges are the best applicator for Metallic Stencil Paints, Interference Paint and Glitter Paints. They can be washed immediately after use or simply disposed of.
Use Stencil Rollers for single colour stencilling of large areas. Rollers create a great finish and because they roll over the stencil shapes they will not snag or lift and tear the stencil – so they are also good for delicate work as well as for covering area. Work the roller in different directions over the stencil to achieve full opacity and eliminate roller marks. Do not allow the paint to dry on the roller and thoroughly rinse out roller heads after use.
Use Stencil Brushes for general stencilling – many people prefer the traditional brush method, so Henny has created specially domed brushes for softer stencilling effects – use our Deluxe Stencil Brush Set for great results. Do not allow paint to dry out completely on the tips of the stencil brush as this can be very difficult to remove. Wash brushes thoroughly after use.
Use our Divided Flower Palette if you will be using multiple colours – it helps to organize the paint and eliminate mess whilst working.
Use repositionable spray adhesive to stick the stencil to the surface being stencilled – this will help prevent paint bleeding under the stencil and will allow you to work easily with both hands. Masking tape alone will not hold the stencil in place and paint is more likely to seep under the stencil if it is only taped down. Repositionable spray adhesive is not available through the Motif website as it comes in a flammable aerosol container which the Royal Mail do not carry inland or internationally – you can obtain the spray adhesive through art shops, craft shops, office shops, stationers and some DIY stores.
Use Low Tack Stencil Tape for masking off the edge of stencils to protect surrounding areas or to mask off motifs on multiple stencil sheets.
Go to Stencil Equipment – for the above items.
Surfaces to stencil onto
Wall surfaces – stencil onto wall surfaces painted with matt emulsion (flat latex paint), rather than silk emulsion (satin latex) – stencilling adheres better to absorbent matt surfaces, but slips on shiny surfaces and may peel away making it non permanent. Seal with Matt or Eggshell Acrylic Varnish to protect areas subject to moisture, or walls that may need wiping down. You can also stencil onto plain plastered or limestone plastered walls.
Painted Wooden surfaces – to stencil onto painted wooden surfaces or furniture painted with waterbased paint, sand lightly to create a key and remove dust prior to stencilling. If you wish to seal the area for protection use Matt or Eggshell Acrylic Varnish. To stencil onto wooden surfaces painted with oil based paints sand thoroughly to create an absorbent surface.
Plain Wooden surfaces – stencil onto smooth, dry, untreated bare wood and then seal with varnish. To prepare surfaces previously coated with varnish – sand to create a key and remove dust; remove wax or polish with methylated spirits and wire wool, sand until smooth and remove dust before stencilling.
Floors – both concrete and wood (including MDF, hardboard and floorboards) are good surfaces to stencil onto. Ensure surface is dry, clean and dust free and seal with Acrylic Eggshell or Gloss Varnish after stencilling. Areas subject to a lot of foot traffic will show wear and tear.
Ceramic wall and floor tiles – are not suitable surfaces to stencil onto if the tiles are in a shower, bath or on a busy floor – even paint advertised as tile paint or masonry paint will wear off quite quickly, especially if exposed to water or a lot of foot traffic. This is because the hard fired surface of the tile will not absorb the paint applied to it, which means it will not bond and will peel away once water works its way underneath the paint.
Fabrics – use the Motif Fabric Paints for best results and stencil onto natural fabrics such as 100% pure cotton, linen or silk or onto viscose. Fabrics with 50% man-made fibre content can be used, but colours will be subject to a faster fade out rate. 100% man made fabrics are not suitable. Prepare fabric by washing to remove any dressings and iron out all creases. For small pieces of fabric lay on lining paper or plastic to protect the surface beneath. For large pieces of fabric prepare a large table top by covering with a sheet of plastic secured to the table top. After stencilling iron the reverse side of the fabric with a hot iron, once the fabric is dry.
Care of stencils
The Motif stencils are made out of mylar (polyester film) which can be used repeatedly and can be washed gently with soap and water to remove stencil paint to prevent clogging of the design. Great care should be taken when cleaning delicate, intricate stencils to avoid breaking the small bridges between the cut out shapes or ‘snagging’ shapes. Store large stencils flat on sheets of paper.